Computer Science and Applications (subject to change)
- Computer Science and Applications Assignments
- CodeHS
- Typing
- Quizlet
- Student Sites
- Google Classroom
- Syllabus
RESUBMITTING ASSIGNMENTS: As discussed in class, any written responses must meet the basic rules of English. At a minimum, if they do not include capitalization and punctuation, they will not be graded. You can and should use Grammarly for all of your responses. If you redo an assignment or makeup a missing assignment, you must email me to submit it. Assignments must be submitted one at a time. Use the assignment names from the assignments listed below as the subject. Your emails to me must use a subject and at least attempt to follow the basic rules of English. Turn on spell check and Grammarly. Your communication to me is not a text or a comment on social media.
Oct 6-
Photoshop yourself in a movie poster
- OBJECTIVE: Create an image in Photoshop using different tools and effects.
- Use one of the provided movie posters to recreate.
- Use the files from your H drive that we downloaded earlier.
- Photoshop yourself into it.
- You can email a picture of yourself to your school email and save it, in class. You do not need to use your phone in class.
- Remember, you need to RECREATE the ENTIRE poster, not just cut and paste yourself into it.
- Include all elements that make it a movie poster.
- Google and place graphics such as the rating.
- Include the movie title and other text. This can be changed to your own text.
- Apply effects to these if needed to replicate the original.
- You will be evaluated on the complexity of the image and the quality of your editing. This means you are not just cutting out your face and pasting it somewhere.
- You need to have at least 5 layers with images, utilize fX, and use adjustments.
- You need to have at least 2 fX
- You need to use adjustments.
- THIS HAS BEEN CHANGED.
- When you are done, SEND ME THE PSD file DO NOT export the jpg and email it to me.
- Use the Subject, Photoshop of Me.
Sep 30-Oct 6
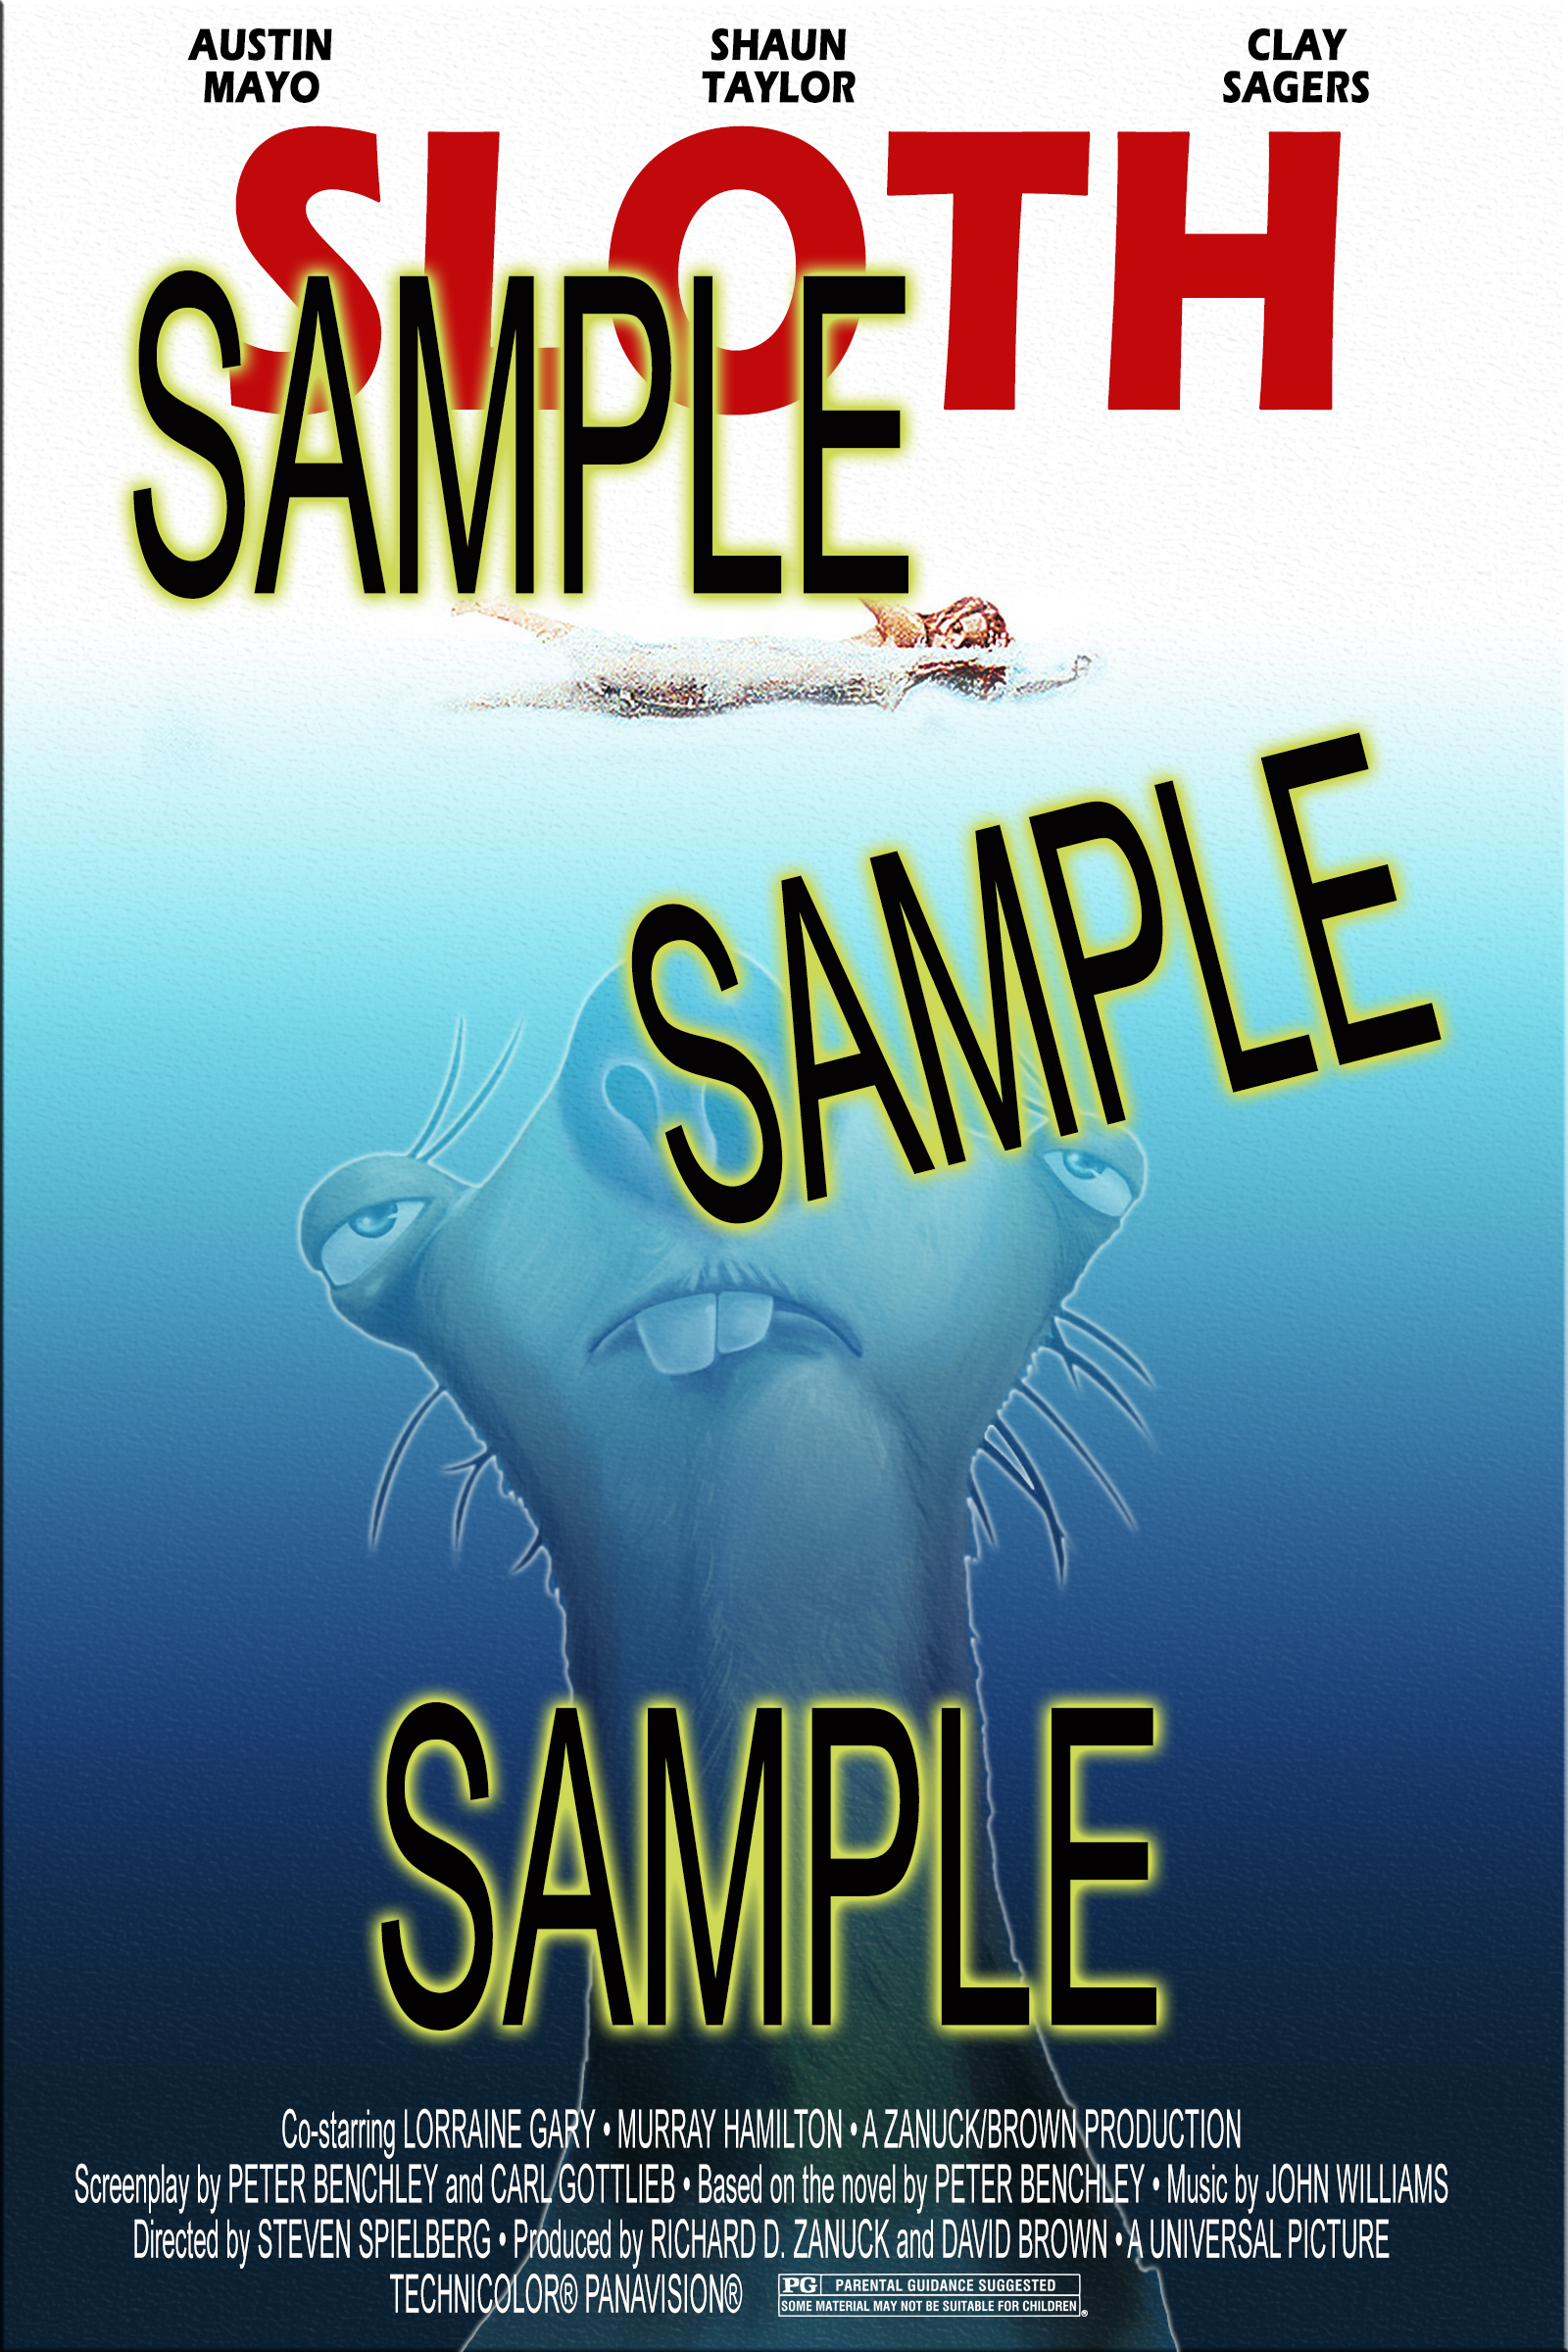
Photoshop Jaws Poster
- OBJECTIVE: Create an image in Photoshop using different tools and effects.
- Video: Adding Text, Stroke, Gradient, and Emboss
- You are recreating the Jaws movie poster, similar to the image below.
- Click the sample image below.
- Copy it and paste it into a new Photoshop document.
- Save the file to your H drive with the filename, yourlastname-jaws.
- Download the orignal jaws poster from the Google Drive below.
- The files are here: https://tinyurl.com/4cd7zvx2
- You can use sid or a different image of your choice to replace the shark.
- The only starter files you need are the orginal jaws poster and sloth if you are using it and not your own image.
- Open the Jaws Poster file in Photoshop. Drag and drop the file into your your Photoshop document.
- You will use the original poster to copy the swimmer from it to your file.
- Add text (names) at the top of the image. Use a similar font and color.
- Add a title at the top, trying to match the font and color of the sample image.
- Add a gradient to mimic water to the entire image.
- This is done with a rectangle and an effect applied to it.
- The rectangle also has a texture applied to it. This is also an effect.
- Cut out the sloth or an image you choose and place it below the swimmer.
- The image should have a stroke or outer glow around it.
- Add the movie credits at the bottom of the poster.
- Copy the following text for the credits at the bottom of the poster.
Co-starring LORRAINE GARY • MURRAY HAMILTON • A ZANUCK/BROWN PRODUCTION
Screenplay by PETER BENCHLEY and CARL GOTTLIEB • Based on the novel byPETER BENCHLEY • Music by JOHN WILLIAMSDirected by STEVEN SPIELBERG • Produced by RICHARD D. ZANUCK and DAVID BROWN • A UNIVERSAL PICTURE •TECHNICOLOR PANAVISION - Include a graphic for the rating. You can Google it and copy and paste.
- The files are here: https://tinyurl.com/4cd7zvx2
- When you are done, export the jpg version and email it to me. Use the Subject, Photoshop Jaws.
Sep 24-29
Make the following images using Photoshop and/or (Photopea if you're at home)
- Star Wars
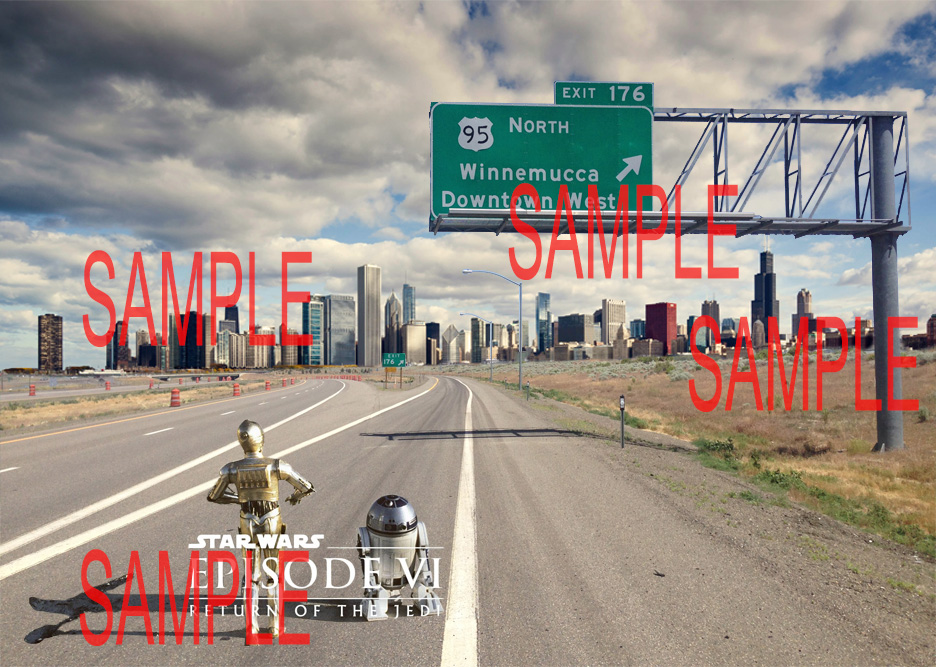
- This image is composed of three images:
- city https://tinyurl.com/2tsnrzf4
- starwars1 https://tinyurl.com/598cphmb
- winnemucca https://tinyurl.com/4rd9kpku
- They are also in the shared Drive: https://tinyurl.com/4cd7zvx2
- Download the images to your H Drive.
- Each will be a different layer in the file you create.
- Open Photoshop.
- Click on the completed sample image below to open the full-size image.
- Right-click on the image and copy it.
- In Photoshop, click File New. If you copied the image correctly, Photoshop will know the dimensions of the image you are creating. Click OK.
- Paste (CTRL+V) the copied image onto the canvas in Photoshop.
- Save the file as a PSD file in your H Drive with the filename yourname_starwars.
- This image will be the lowest layer in Photoshop so you can use it as a guide.
- Lock this layer.
- Open the city image from your H Drive.
- Video: Editing City Image
- The video says to save in your 305 folder. We are using your H drive instead.
- Drag this to the image you just created and place it in a layer above the completed sample image. Do this by clicking and holding and then dragging the image from the current Photoshop tab to the yourname_starwars tab.
- Adjust the layer so they are exactly aligned.
- Remove the water but leave the cityskyline from this layer. Use whatever selection tools you prefer.
- When you are done, lock the layer.
- Video: Editing City Image
- Open the winnemucca image from your H Drive.
- Video: Editing Winnemucca Image
- The video says to save in your 305 folder. We are using your H drive instead.
- Drag this to the image you just created and place it in a layer above the completed sample image. Do this by clicking and holding and then dragging the image from the current Photoshop tab to the yourname_starwars tab.
- Adjust the layers so they are exactly aligned.
- Remove the sky but leave the road and the sign. The magic wand will work well for this. Remember to remove the sky from the framework of the sign. Use whatever selection tools you prefer.
- When you are done, lock the layer.
- Video: Editing Winnemucca Image
- Open the starwars1 image from your H Drive.
- Video: Editing starwars1 Image
- The video says to save in your 305 folder. We are using your H drive instead.
- Drag this to the image you just created and place it in a layer above the completed sample image. Do this by clicking and holding and then dragging the image from the current Photoshop tab to the yourname_starwars tab.
- Adjust the layers so they are exactly aligned.
- This image will take longer to cut out and you will need to use a variety of tools. Don't forget to keep the words and the shadow.
- Hide the layers so you can see the completed sample image and align your layers accordingly.
- Video: Editing starwars1 Image
- When you are done, export the jpg version and email it to me with the subject Photoshop Star Wars.
Sep 23
Assembly: Shortened ClassesSep 21-23
Finish Gump in Photoshop
Sep 18
Makeup WORK
- Remember you can still submit missing assignments but you must send me an email with the assignment as subject.
Typing.com
- Type for 10 minutes at the beginning of the period.
- Up to 5 points of extra credit for typing longer than 10 minutes.
- Remember to login with your school Google account, it tracks your time. If you are not logged into the class you WILL NOT receive credit.
Sep 16-18
Make the following images using Photoshop and/or (Photopea if you're at home)
- OBJECTIVE: In Photoshop or Photopea (video) utilize various tools to recreate a given image.
- The explanation of the assignment can be viewed in here.
- Download from the "student_files" Google Drive
- Starter image files to download are available here.
- Save the folder in your personal H Drive.
- Forrest Gump
- Demo Video
- Open Photoshop.
- Click on the completed sample image below to open the full-size image.
- When you are done, export the jpg version and email it to me with the subject Photoshop Forrest Gump.
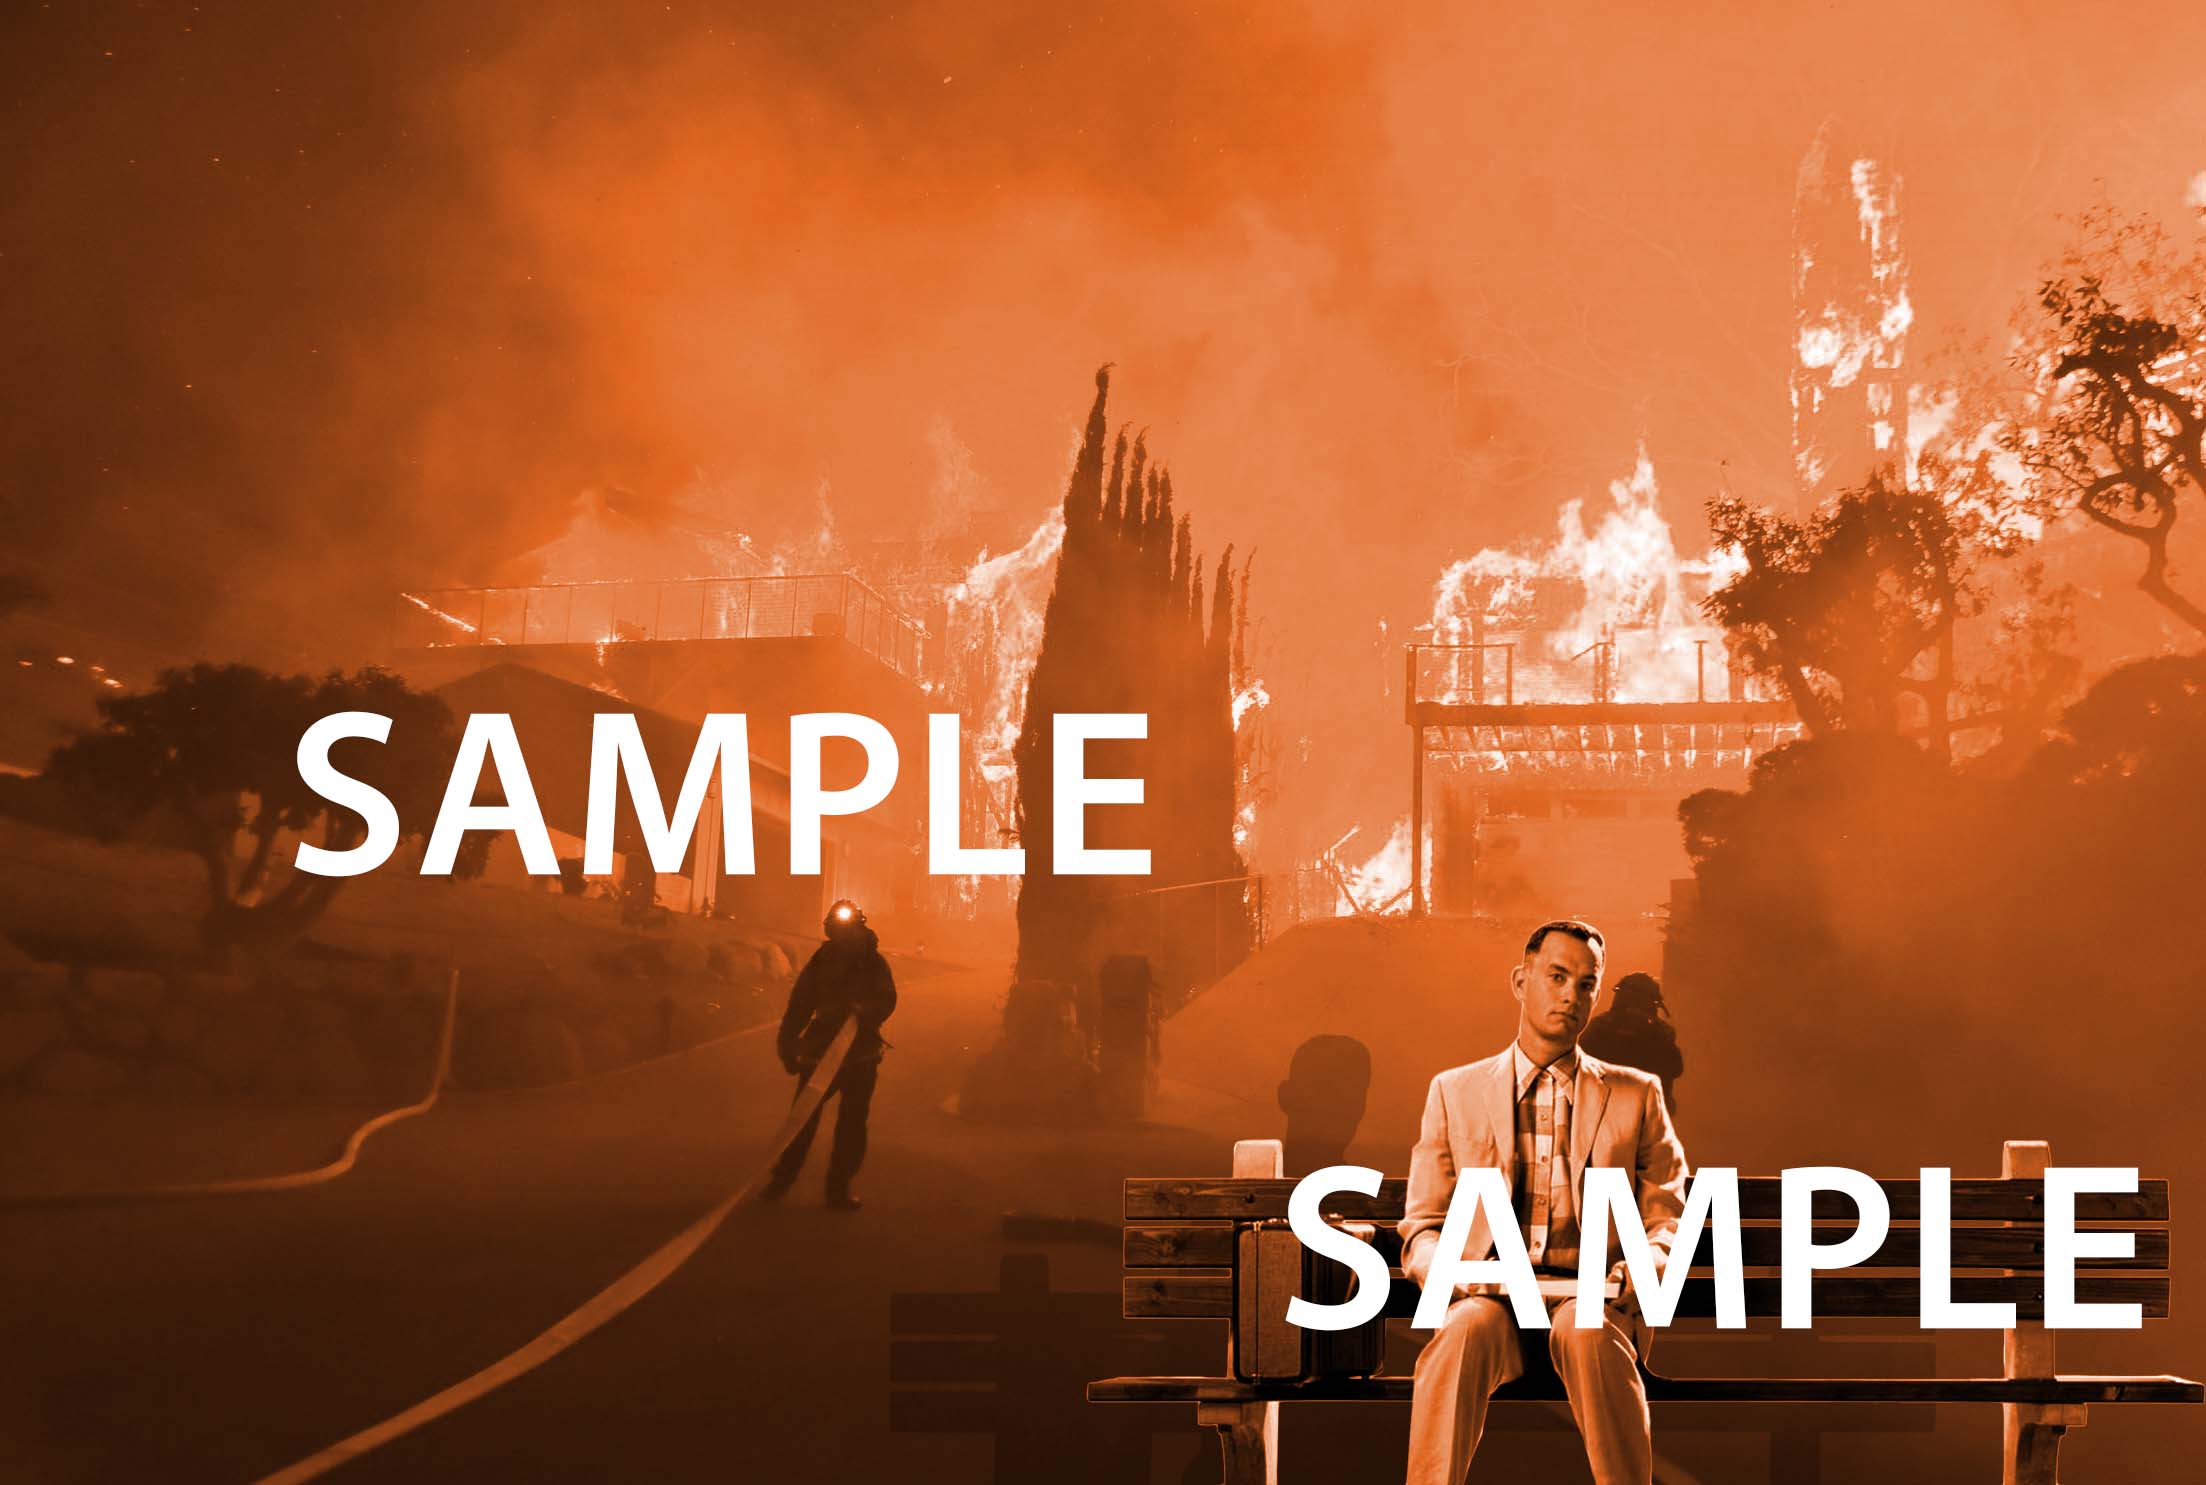
- When you are done, export the jpg version and email it to me with the subject Photoshop Forrest Gump.
- Right-click on the image and copy it.
- In Photoshop, click File New. If you copied the image correctly, Photoshop will know the dimensions of the image you are creating. Click OK.
- Paste (CTRL+V) the copied image onto the canvas in Photoshop.
- Save the file as a PSD file in your H Drive with the filename yourname_forrest_gump.
- This image will be the lowest layer in Photoshop so you can use it as a guide.
- Lock this layer.
- Download the fire image from the Google Drive above to your H Drive.
- Open the image in Photoshop and drag this to the image you just created and place it in a layer above the completed sample image. Do this by clicking and holding and then dragging the image from the current PhotoShop tab to the yourname_forrest_gump tab.
- Adjust the layer so they are exactly aligned.
- Download the gump image from the Google Drive above to your H Drive.
- Open the image in Photoshop and drag this to the image you just created and place it as the topmost layer above the fire image.
- Cut out Forrest Gump.
- Use a variety of selection tools.
- Make sure you have the correct layer selected when you are trying to cut the image out.
- Your cuts must be precise. Use multiple tools and make sure you zoom in.
- Flip the image horizontally.
- This is easier when you have Show Transform Controls selected.

- This is easier when you have Show Transform Controls selected.
- Adjust Levels. This is in the Adjustments panel and will create a new layer.
- Only apply this to the gump image.

- Only apply this to the gump image.
- Adjust Hue/Saturation and apply this to all layers.
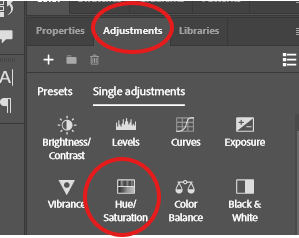
- Apply drop shadow. This is done through the Fx panel.
Sep 16
CodeAI Unit 3 - Web Development https://studio.code.org/
Sep 15
End of Unit Assessment https://studio.code.org/
Sep 10-14
Unit 1 - Problem Solving with AI: https://studio.code.org/
- Lesson 13: AI Time Capsule Project
- All of these directions are in Google Classroom
Sep 9
Typing.com
- Type for 10 minutes at the beginning of the period.
- Up to 5 points of extra credit for typing longer than 10 minutes.
- Remember to login with your school Google account, it tracks your time. If you are not logged into the class you WILL NOT receive credit.
Complete Lesson 12
Missing Assignments Report
- Sub will pass them out
Sep 8
Unit 1 - Problem Solving with AI: https://studio.code.org/
- Lesson 12: AI's Role in Society
Sep 3
Unit 1 - Problem Solving with AI: https://studio.code.org/
- Lesson 12: AI's Role in Society
Sep 2
Typing.com
- Type for 15 minutes at the beginning of the period.
- Remember to login with your school Google account, it tracks your time. If you are not logged into the class you WILL NOT receive credit.
Finish: Unit 1 - Problem Solving with AI: https://studio.code.org/
- Lesson 10: Remixing, Creativity, and Originality
- Lesson 11: Ownership, Ethics, and Creativity
Sep 1
Unit 1 - Problem Solving with AI: https://studio.code.org/
- Lesson 10: Remixing, Creativity, and Originality
- Activity 2: Complete the work in the activity, but you will use Google Gemini to create a social media post about a Lowry event that must include an image.
- First have Gemini create an image on its own.
- You must send the image to me in an email with the Subject Lesson 10 Activity 2.
- Activity 3: Now use an image from https://lowryhighschool.com/ to have Gemin create a social media post. You can upload an image to Gemini or use the link to the image.
- Add detail to your prompt, but you can make up the event. For example, you should add a theme to your event, school colors, dates, etc.
- You must send the image to me in an email with the Subject Lesson 10 Activity 3.
- Activity 2: Complete the work in the activity, but you will use Google Gemini to create a social media post about a Lowry event that must include an image.
- Lesson 11: Ownership, Ethics, and Creativity
- Mark the first activity complete, provide any answer for the second activity.
Aug 28-31
Unit 1 - Problem Solving with AI: https://studio.code.org/
- Lesson 8: Debugging and Refining Outputs
- Lesson 9: AI as a Co-Creator
Aug 27
Unit 1 - Problem Solving with AI: https://studio.code.org/
- Lesson 7: AI's Wild Imagination
Aug 26
Typing.com
- Type for 10 minutes at the beginning of the period.
- Remember to login with your school Google account, it tracks your time. If you are not logged into the class you WILL NOT receive credit.
Unit 1 - Problem Solving with AI: https://studio.code.org/
- Lesson 6: Understanding Bias
Aug 24-25
Unit 1 - Problem Solving with AI: https://studio.code.org/
- Lesson 4: Smart or Just Predictable?
- Lesson 5: Uncovering Contradictions
Aug 21
Unit 1 - Problem Solving with AI: https://studio.code.org/
- Lesson 2: Beyond Words
- Lesson 3: The AI's Brain
Aug 20
Unit 1 - Problem Solving with AI: https://studio.code.org/
- Lesson 1: Talking to Machines
Aug 19
Typing.com
- Type for any amount of time to prove you're in the class
Unit 1 - Problem Solving with AI: https://studio.code.org/
- Pre-Assessment
- Lesson 1: Talking to Machines
- Lesson 2: Beyond Words
- Lesson 3: The AI's Brain
- Lesson 4: Smart or Just Predictable?
- Lesson 5: Uncovering Contradictions
- Lesson 6: Understanding Bias
- Lesson 7: AI's Wild Imagination
- Lesson 8: Debugging and Refining Outputs
- Lesson 9: AI as a Co-Creator
- Lesson 10: Remixing, Creativity, and Originality
- Lesson 11: Ownership, Ethics, and Creativity
- Lesson 12: AI's Role in Society
- End of Unit Assessment
Aug 18
DUE: Student Syllabus Verification in GC
Finsish registering for platforms
Aug 17-18
Seating Chart
Course requirements/expectations
- Syllabus: parents can sign ther verfication or email me at respinola@hcsdnv.com.
Assignment:
- Complete registration for websites below.
- Student Syllabus Verification
- Complete in Google Classroom
- You must sign in with your Google Classroom account.
- You should have received and email inviting you to the classroom.
Join Your period in https://studio.code.org/
- This will be done automatically when you join Google Classroom.
Join Typing.com (https://www.typing.com/)
- You should be automatically added to typing.com through Google Classroom.